1. Introduction
This Custom Checklist field type provides the following functionality:
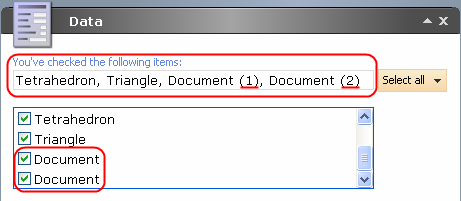
- The field represents a customized checklist:
-
There is a text line above the checklist where a User can see the names of the currently selected Items.
-
The checklist is populated by using the Sitecore Query expression entered into the Source field.
This article also describes how to add Items to the list, regardless of the hierarchy, using query expressions.
It is also shown how to add Items to the list regardless of the hierarchy using query expressions.
Please refer to the Creating a Composite Custom Field article for more information about custom fields.
2. Installation
The CustomChecklist field is distributed as a standard Sitecore package; hence in order to start using it, you must install the package. Please refer to the Installing Modules and Packages article if you are not familiar with the standard Sitecore Packager tool.
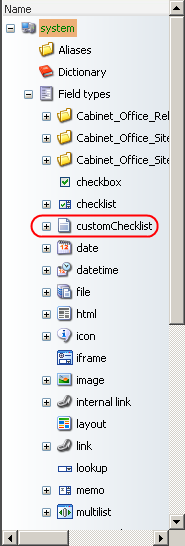
After the package installation, you will see the CustomChecklist field in the list of Field types.
To use the custom field, you should add the following line to the <controlSources> section in the web.config file:
<source mode="on" namespace="Sitecore.Shell.Extensions" assembly="CustomChecklist" prefix="contentExtension"/>
3. General Description
After the package installation, you will see that the new field type called customChecklist has been added to System/Field types.
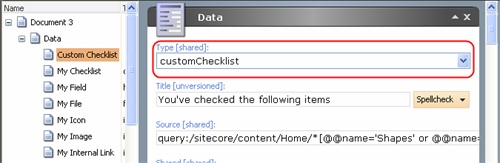
You can add this field to a template section and create Items based on this template.
This composite field type consists of two fields: Text field and Checklist field.
Text field is read-only and is used for displaying the checked Items. It is useful for checklists which contain a lot of Items. If a checklist holds several Items with the same names, they will be displayed with the numbers in the end.
When reading the values from the web database, these are represented as a string containing GUIDs separated by a ”|” separator. For example:
{707EECFA-BED0-419C-8C8F-20E19B0CAC43}|{ED5E6E79-E6C0-4399-8985-C17AD0E7C8F7}
4. User Manual
The example below shows how to use the Custom Checklist field.
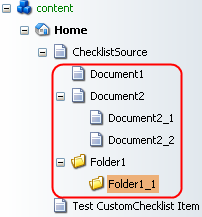
- Create a tree structure as shown in the picture below
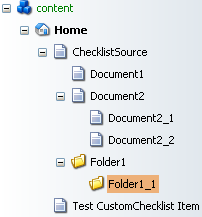
Where:
- The Test CustomChecklist Item is based on the Template which includes a customChecklist field;
- The ChecklistSource Item and all Items with the Document prefix are based on the Document template;
- Items with the Folder prefix are based on the Folder template.
A User can set the conditions that define which Items will be added to the checklist.
These conditions are set in the Source field of the customChecklist field.
Sitecore query expressions are used in the Source field.
4.1. Sample Sitecore Query Expressions
This section is currently under construction. Please check back later.
4.1.1. Case 1
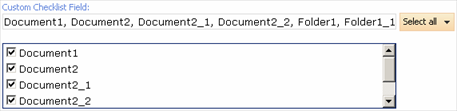
To include all Items with their children under the ChecklistSource Item in your customChecklist field, provide the following expression:
query:/sitecore/content/Home/ChecklistSource/descendant::*
This will generate the following field:
4.1.2. Case 2
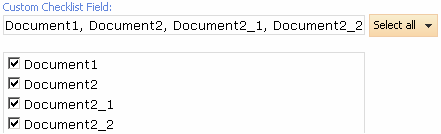
To include Items based on the Document template under the ChecklistSource Item, provide the following expression:
query:/sitecore/content/Home/ChecklistSource/*[@@templatekey='document']/descendant-or-self::*
This will generate the following field:
4.1.3. Case 3
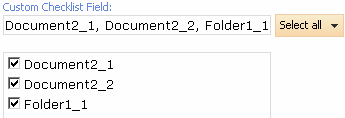
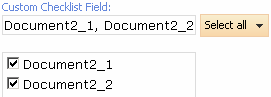
To include Items under the Folder1 Item and Document2 Item, provide the following expression:
query:/sitecore/content/Home/ChecklistSource/*[@@id='{48B66106-236D-42AA-B821-C26F36FA5CCE}' or @@id='{425AC960-1C4F-4221-9E80-85C5FDC0298E}']/descendant::*
where {48B66106-236D-42AA-B821-C26F36FA5CCE} and {425AC960-1C4F-4221-9E80-85C5FDC0298E} are the GUIDs of Folder1 Item and Document2 Item respectively.
This will generate the following field:
4.1.4. Case 4
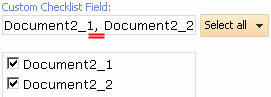
To include Items under an Item with the name Document2, provide the following expression:
query:/sitecore/content/Home/ChecklistSource/*[@@name='Document2']/descendant::*
This will generate the following field:
4.2. Changing the Separator
Change the separator between Item names in the Text field of the control by including the &separator= modifier at the end of the Source expression. The example below sets semicolon as the separator for the list of Items:
query:/sitecore/content/Home/ChecklistSource/*[@@name='Document2']/descendant::* &separator=;